My Humble Homelab
Homelabs
If you’re not familiar with what a Homelab is, it’s essentially a collection of servers or advanced networking equipment, usually more commercial-focused, residing in a residential setup. These servers are typically running a virtualization OS that controls a variety of virtual machines running fun projects or quality of life services.
I think the term originally got most popular on Reddit where you have technology-lovers posting pictures of their giant rack mounted servers and networking equipment. It’s wholly overkill in a home environment, but it’s more about being a hobby that teaches you practical skills than anything else.
Humble Beginnings
My first initial version of a Homelab was purely just wanting better Wi-Fi and network security in my home. I’m a very security-oriented person and it just doesn’t sit right with me that every IoT (Internet of Things) device in my home like my smart thermostat has unfettered access to the internet. Exploited IoT devices are responsible for some of the largest DDoS attacks to date. A Comcast or ATT Modem/Router/Access Point combo isn’t sufficiently secure or configurable as they should be. Not to mention most people typically have their cable or fiber line in inconvenient (but typically hidden) spots, which means often means terrible Wi-Fi signal.
The solution I came up with is to run my own gateway, switches, and ceiling-mounted access points for maximum signal quality. Open and accessible access points solve the Wi-Fi signal problem, but if every device in your home is on Wi-Fi, you still may be encountering slow speeds or higher latency. The easiest fix: hardwire ethernet every device that can be. This results in faster Wi-Fi speeds for devices that can’t (as less devices are on Wi-Fi), and faster and lower-latency internet for all devices that are wired.
Ubiquiti is a well-known player in the prosumer (professional consumer) and small business networking/security space. I was already familiar with Ubiquiti equipment since that’s what powers the office space at the company I work at. Their equipment is reasonably priced as far as this sort of equipment goes, and it’s exceptionally powerful with a beautiful management interface. It’s a good choice between your $150 Netgear consumer router and CISCO routers that can run thousands a piece.
I picked up the follow equipment:
- UniFi Dream Machine Pro (gateway/router/switch/brains)
- UniFi 24 port PoE Switch (connect up all my ethernet drops in every room, access points, and cameras down the road)
- UniFi NanoHD Access Points (buttery smooth Wi-Fi)
- APC BackUPS 1500VA (uninterruptible power supply, internet/wifi even with power outages!)
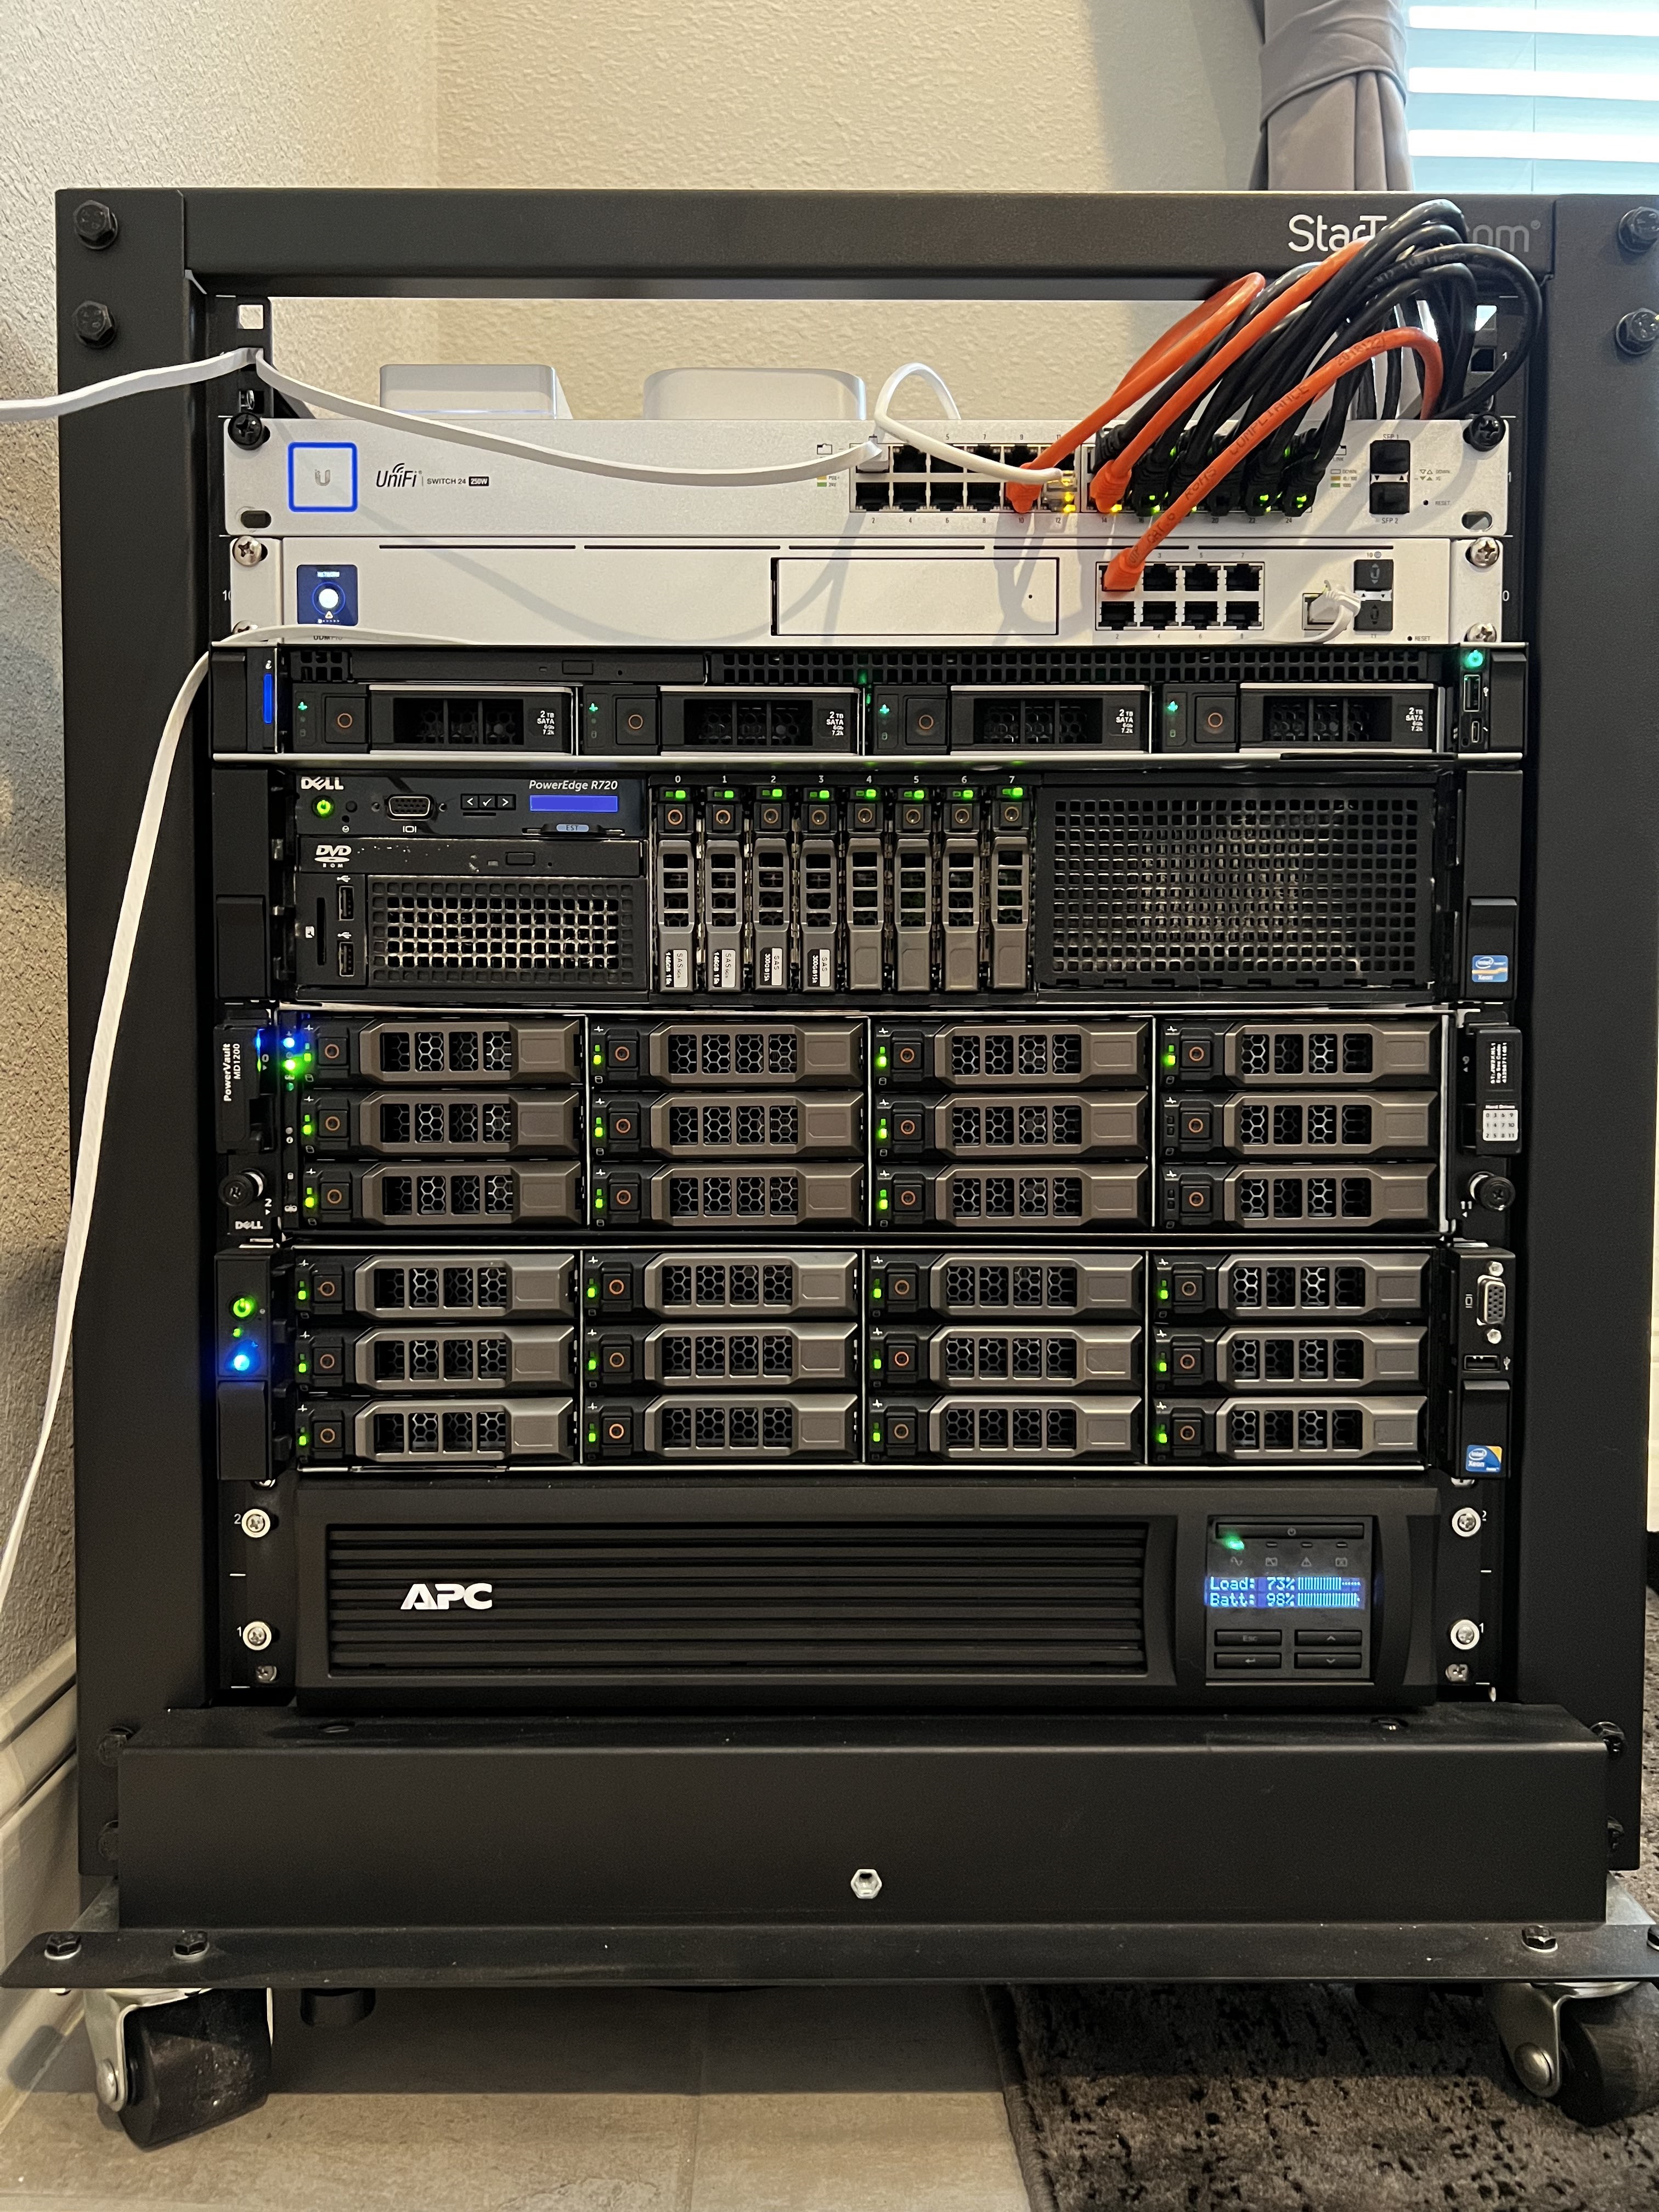
- StarTech 12U open-frame rolling rack (gotta have a place to put it all, with room for expansion)
Expansion
Anyone who has ever had a Homelab knows it always starts small, solving a problem. It rarely stay that way though. Next thing you know, you have rack-mounted enterprise-grade equipment that sounds like an airplane taking off, and outputs a commensurate amount of heat to the electricity it consumes. They were designed to live in server rooms with dedicating cooling lanes after all.
I had two goals in mind at this point:
- I hate ads and tracking. Pi-hole is a must.
- I wanted to run a Plex server. It’s like Netflix for your locally-hosted movie and TV shows
Pi-hole
Pi-hole is one of the best things you could ever run on your home or business network. It acts as a DNS server that all devices on your network use to lookup domains. The power comes from its curated blocklist of domains. Ads? Gone. Facebook tracking? No more. Google Analytics or Google Tag Manager? Nope. Malware? Less of a concern.
This means that every device on your network, including your phone, iPad, fridge (lol), laptops, desktops, etc. are unable to phone home to their tracking or ad services. Previously, there’s been limited options for ad-blocking or tracking prevention on your phone while browsing the web, or especially on mobile apps/games.
Say goodbye to websites with twenty ads that track everything you do. That interstitial ad that takes over your entire screen between actions in a mobile game? Also gone. It just doesn’t appear like it never even existed in the first place. Everything is so peaceful until you have to browse the web while you’re out and re-realize just how covered the internet is in ads. You could setup a VPN on homelab and tunnel all your mobile traffic to your home network while you’re out, but that’s a topic for another day.
Pi-hole could be ran on an extraordinarily tiny RaspberryPi, but what would be the fun in that? Besides, a RaspberryPi can’t handle running a Plex server for your movies and TV shows.
Plex
Plex is just a beautiful, Netflix-like interface for all your local movies and TV shows. I’ve amassed quite a lot of media over the years and it’s nice just having it all locally on my network, while still being accessible from anywhere. I don’t have to rely on Netflix or Hulu removing a show I’m in the middle of watching.
My First Server
A friend of friend ended up with a Dell R720 server. The specs were impressive, such as dual Xeon processors, 128GB of DDR3 RAM, with 8x external 2.5” drive bays and 2x internal 2.5” bays. A gorgeous, if not extensively-used powerhouse. The thing with enterprise servers is they’re expensive, but they can be had for a huge discount once they’ve served their life for a business. This bad boy was being offered for $450, all I had to do was supply my own drives. Deal. I had a point of realization when I went to pick this thing up. It’s massive. These rackmount servers are 19” wide and almost 30” in depth with some serious weight.
Virtualization
VMWare is typically the gold standard for virtualization, but I’m not too keen on paying insane prices just to run a couple virtual machines at home. Luckily, there’s an open-source solution that is loved by the homelab community: Proxmox.
Getting the new server configured and running the Proxmox OS was simple and straightfoward. Even figuring out the first VM setup, while not the most ideal settings, worked flawlessly. Later down the road I ended up reading through some tutorials and tweaked the 200 options to something a bit more optimal for my hardware.
I got Pi-hole up and running on its own baby VM with 4GB of RAM and 4vCPUs and used the UniFi Network configurator to force all my home devices to use Pi-hole as the DNS server now. Pi-hole’s upstream DNS uses Cloudflare’s DNS serice 1.1.1.1, of course. Can’t beat the privacy and speed.
Plex itself was also fairly straightforward. I chose Ubuntu as the base image and was up and running in no time at all. Moving over my terabytes of movies on the otherhand, took some time.
It Continues
From here on out, things progressed pretty rapidly. I ended up picking up another Dell R710 from eBay to use as another virtualization server. I think it was mostly because I didn’t want the server rack to feel lonely with only a couple things in it. I did have 12U of space to fill up, with switches only taking up 1U and servers taking up 2U.
Storage was starting to become a concern for Plex so I decided to pick up a Dell R510 from eBay. This server is special because the entire front is 3.5” drive bays. Twelve of them to be exact. I can’t stop there though. I picked up a Dell PowerVault MD1200 from eBay, which is essentially just a bunch of drives. An expansion bay more or less, for the R510 server. In total, the R510 has 12 external 3.5” drives and 2 internal 2.5” drives for the OS. The MD1200 expands on that to add another 12 3.5” external drives for a grand total of 24x 3.5” drives available to hotswap.
Back on eBay again. This time to get some drives. Buying that many brand new drives would be a very expensive endeavor. I was able to pick up a lot of 22 used 10k RPM SAS hard drives, 2TB each.
The setup now is Plex still runs on the R720 virtualization server, but uses a network drive for all media from the R510. The R510 now runs FreeNAS in RAID10 with my 22x 2TB SAS drives to store all of the Plex movies and TV shows.
Scroll down to the bottom to see a bunch of photos of the setup.
Network Security
Pi-hole is just a small piece of a little more safety on the web, but I want to do better than that. The next step is VLANs and multiple SSIDs. I keep all IoT traffic on their own VLAN with firewall rules specifying that they can only access very specific domains. They’re free to communicate internally on the network so they can fulfill their smart home duties, but access to the internet is severely limited. In some cases, these devices cannot send any requests outside of my network. IoT devices get their own SSID too, so when setting up a new IoT device, it just connects to that network with limited internet connectivity.
I have UniFi exterior cameras around my home, which means there is also PoE running to these cameras for both power and data. In a worst-case scenario, an attacker could disable and remove one of these cameras and have direct access to my home network. These cameras are also on their own VLAN, only having access to the Dream Machine Pro’s Protect server to record footage. This recorded video is then accessed from the Protect app from any trusted device on the network or remotely through UniFi’s cloud tunnel.
The trusted VLAN is composed on all of my trusted devices by MAC address. This might be overkill, but even if someone somehow gains access to my trusted network, if they’re not on the MAC list, they won’t be doing anything anyway. Adding or updating a trusted MAC address is simple.
All of this might seem like a bit much for a home network, but I take security seriously in every aspect of my life. What I practice at home, I can practice at work too. Since I typically work from home, I want to ensure all data on my work laptop is as protected as can be too.
Conclusion
Homelabs are cool. I’m gonna add some photos down the road but I think this post got carried away. I’ve left out so many details but this is also much longer than I was expecting. Security, networking, and infrastructure is extraordinarily fun. If you want a new hobby and you’re in a technical field, give it a shot. You never know when something you learn might come in handy.
Full Equipment Setup
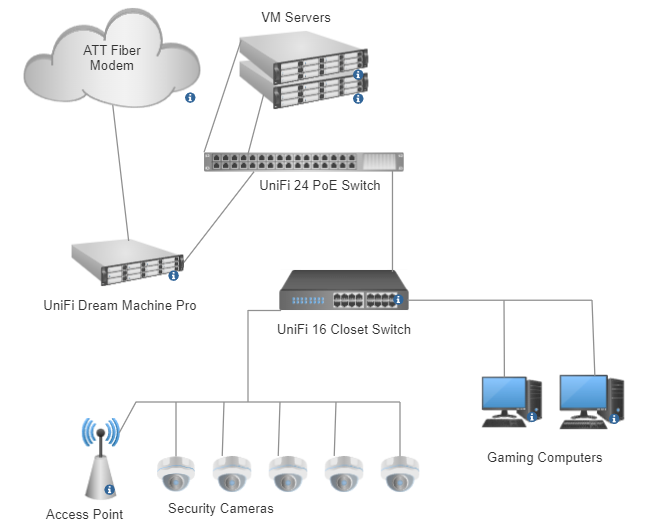
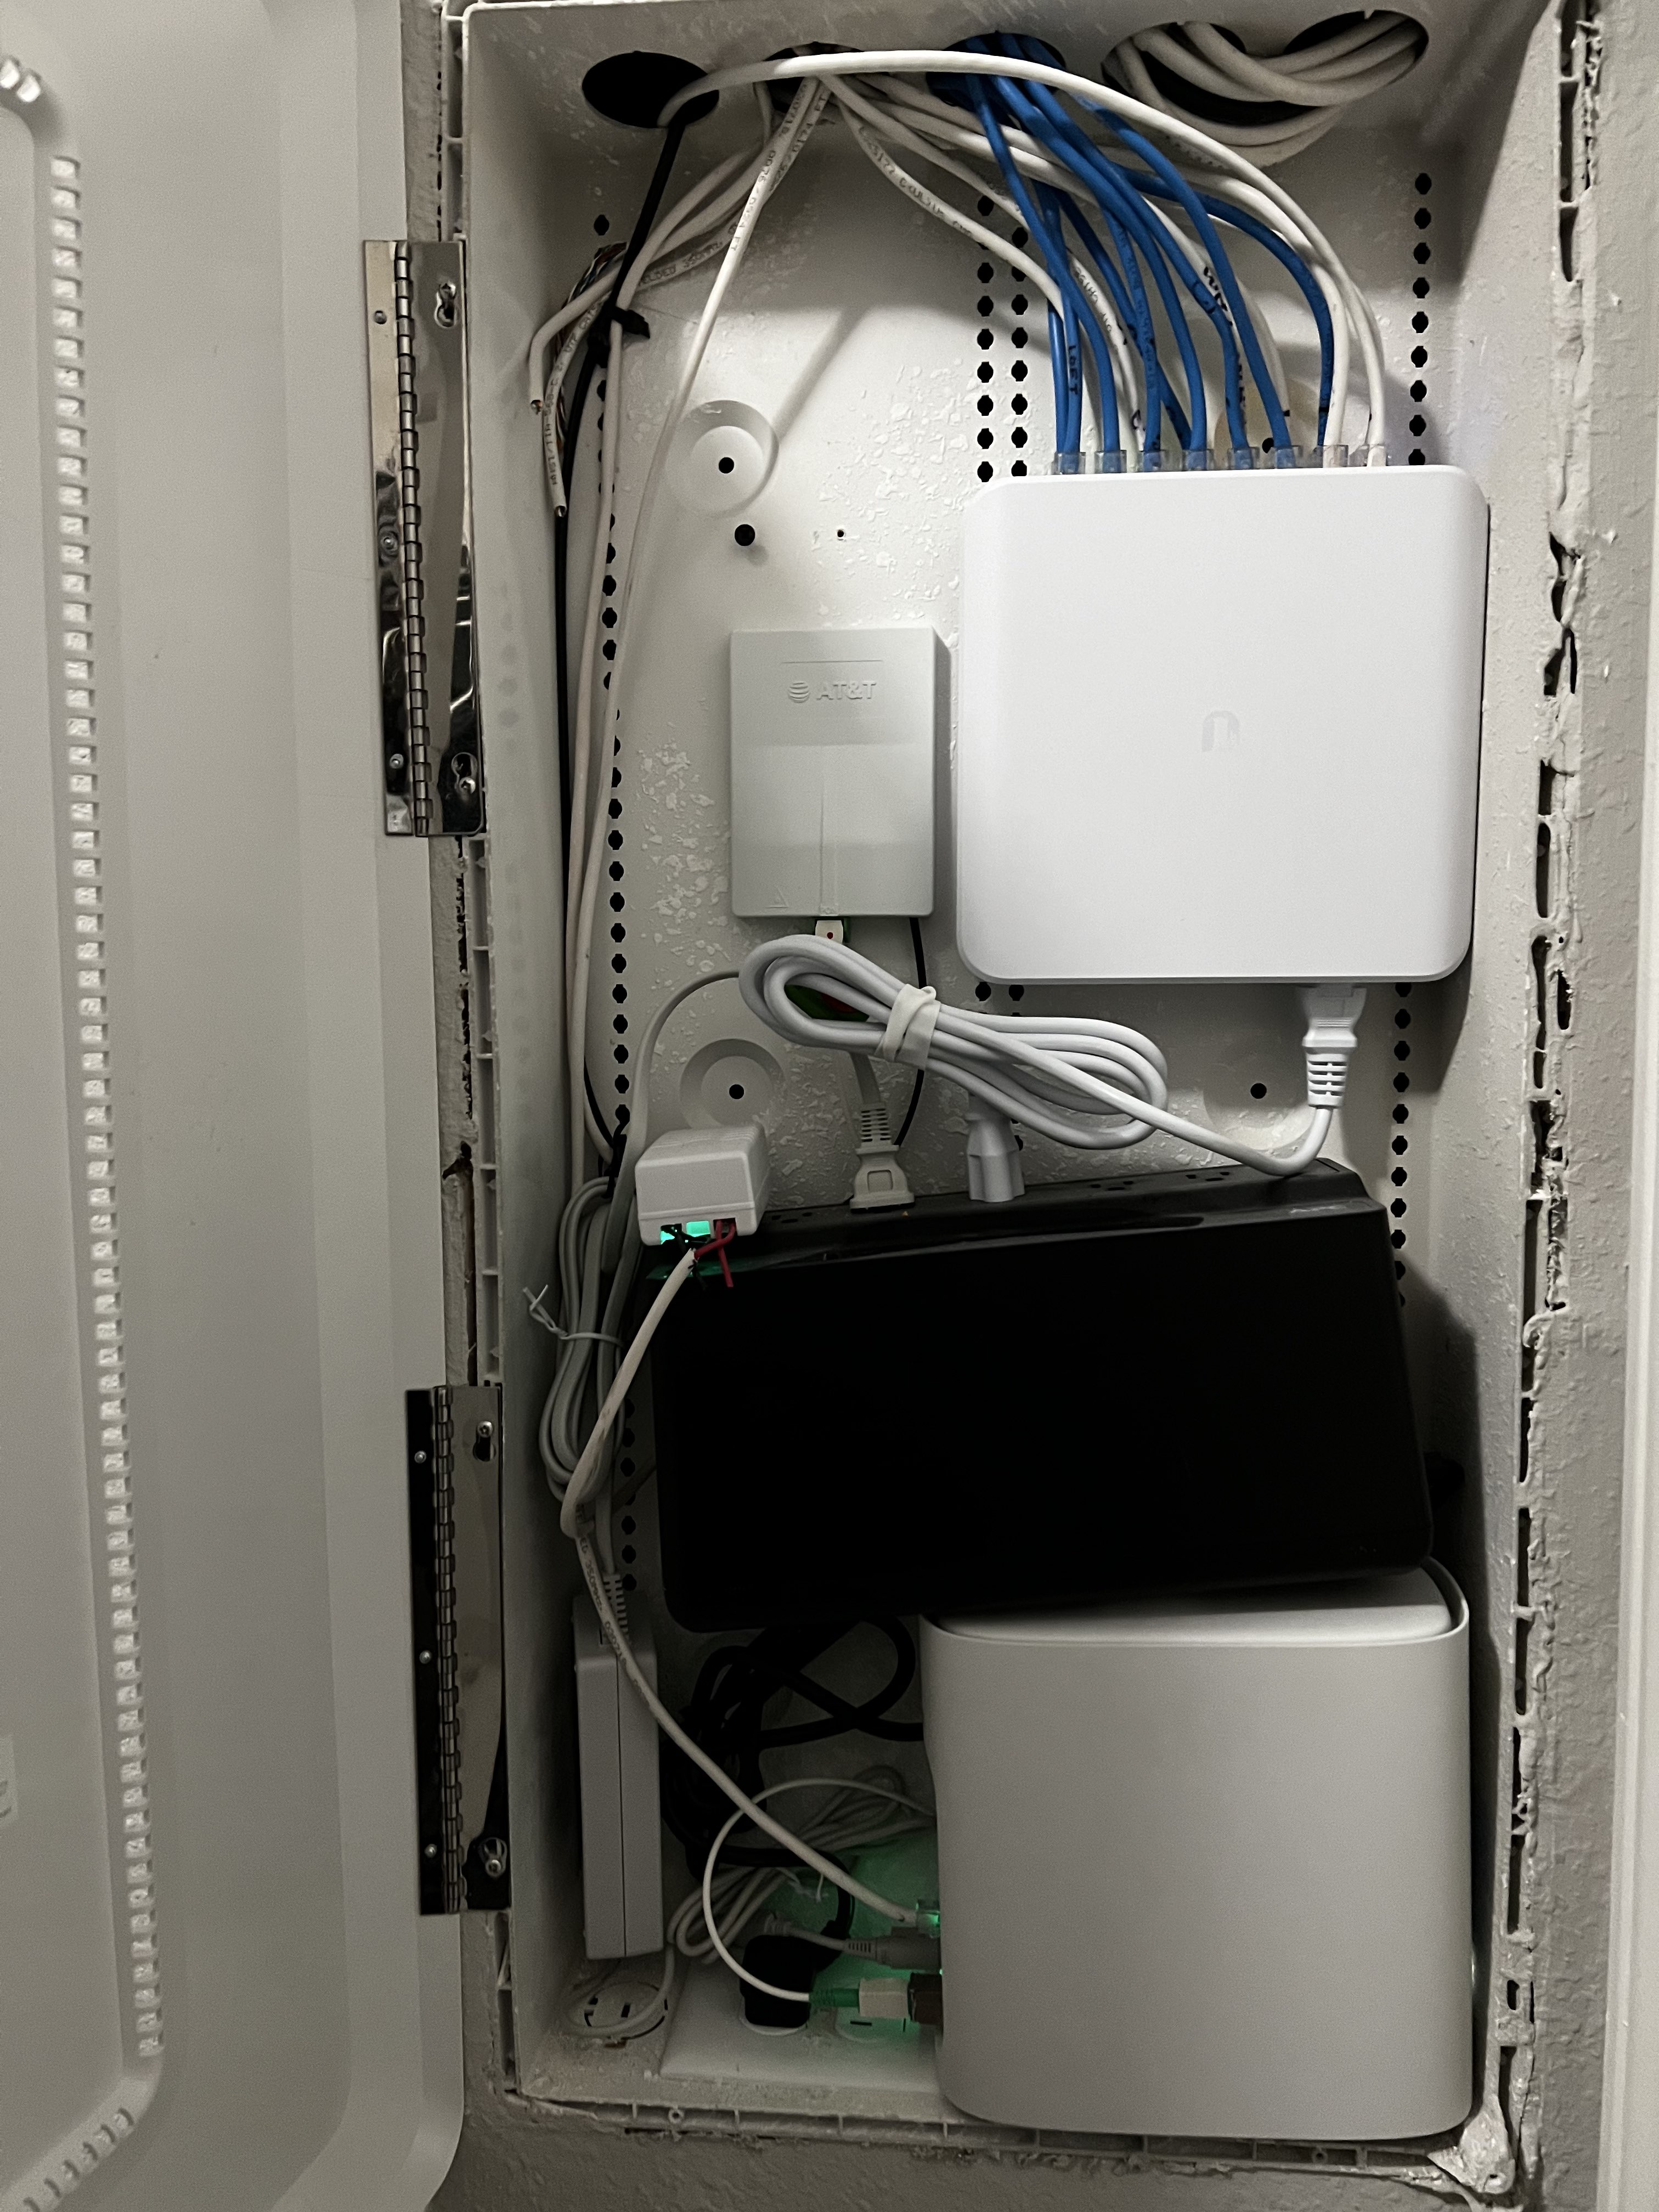
- ATT Gigabit Fiber Modem
- UniFi Dream Machine Pro - gateway, router, switch, firewall
- UniFi 24 Port PoE Switch - rack switch
- UniFi 16 Port PoE Switch - network closet
- UniFi 4 Port Switch for behind media cabinet
- Dell R720 - 256GB DDR3 RAM, 8TB storage across various drives, 2x 1TB SSDs for OS in RAID1
- Dell R510 - 32GB DDR3 RAM, 24TB storage, 2x 1TB SSDs for OS in RAID1
- Dell PowerVault MD1200 - 20TB storage
- APC BackUPS 1500VA - Backup battery for rack
- APC BackUPS 600VA - Backup battery for network closet
- Phillips Hue Hub for a couple smart bulbs
- Lutron Caseta Hub for entire home smart switches for lights
Current Virutal Machines
- Pi-hole
- Plex
- Minecraft servers (you’re never too old to play minecraft)
- Home Assistant
- FreeNAS, NAS for Plex movie storage
- Heimdall for keeping track of all the various services
- Docker VM just for playing around with docker images
Photos
Can’t forget the network diagram that took me about 4 minutes to make.